DATEV eG is a software house and IT service provider for tax consultants, auditors and lawyers, but also for their clients. Most tax consultants and auditors in Germany use DATEV software. As an entrepreneur in Germany, you can hardly ignore DATEV when it comes to tax and accounting.
 ZEIT.IO - DATEV Integration
"DATEV Unternehmen online" is the DATEV cloud solution for entrepreneurs. Here, receipts can be uploaded and shared with the tax advisor. Even if you as an entrepreneur do not use the product directly and do not have access to it, it is very likely that your tax advisor uses the product and your company is managed there as a client.
If you now create invoices on ZEIT.IO, sooner or later these invoices should also end up at DATEV. As long as there are only a few invoices per month, you can upload them manually to "DATEV Unternehmen online". Or you can send the invoice to your tax advisor via email and they will then upload it to DATEV. You can do it that way, but it has nothing to do with automation and digitization!
Now there is a possibility to connect your DATEV account with ZEIT.IO. When this connection is established, every invoice that is finalized in ZEIT.IO is also automatically sent to DATEV. These 4 steps are necessary for this connection:
- Generate a ZEIT.IO sender email address and copy it to the clipboard.
- Create DATEV target email addresses for incoming and outgoing invoices.
- Store the DATEV target e-mail addresses at ZEIT.IO.
- Add the ZEIT.IO sender email address to the list of “Authorized Senders” at DATEV.
The order of these steps is very important!
ZEIT.IO sender email address
At ZEIT.IO, go to Settings in the main menu and then to Add-Ons. Then click on "DATEV Upload E-Mail". You should then see a form that looks something like this:
 ZEIT.IO - DATEV Upload Mail Configuration
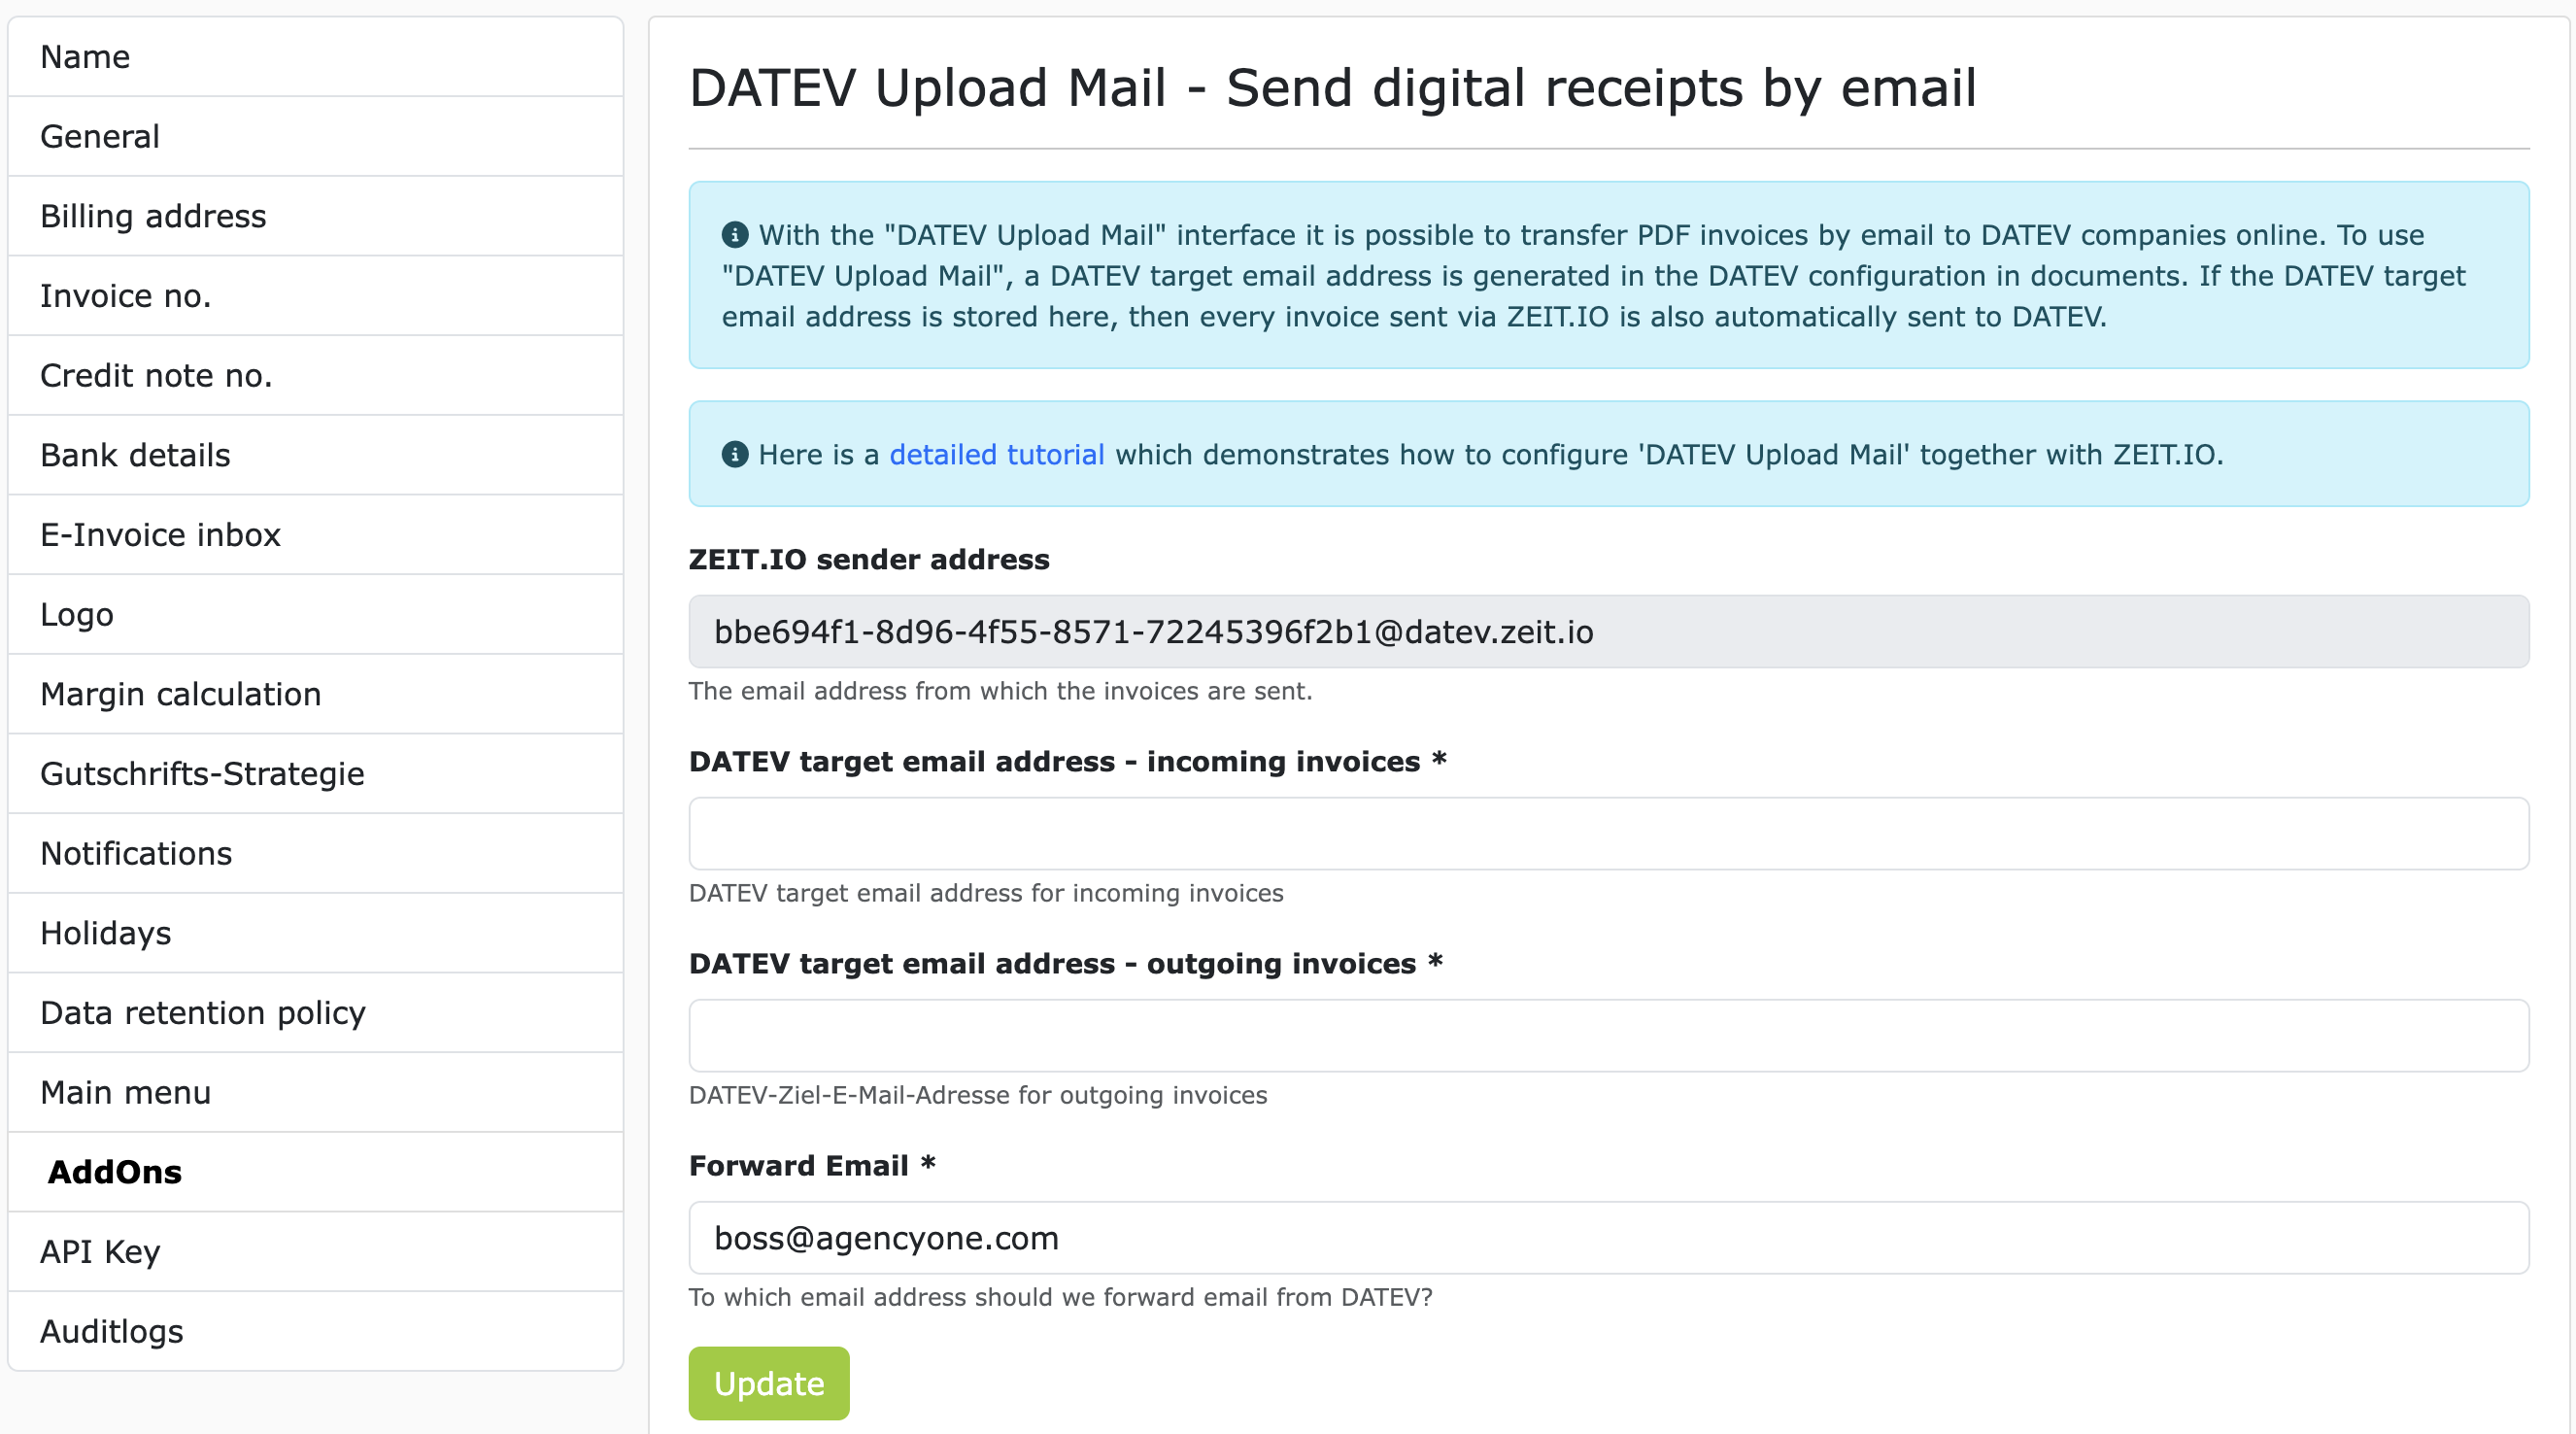
On this page, in the first grayed-out input field, you will find a randomly generated ZEIT.IO sender address for DATEV Upload Mail. ZEIT.IO will always use this email address to send invoice documents to DATEV. Copy this address to the clipboard. This address must be stored with DATEV as an authorized sender.
Also enter a "Forward Email" address. The forward email is your own email address or an email address from your company. If ZEIT.IO receives emails for your DATEV account, these emails will be forwarded to the "Forward Email" address. Once you have stored this address, please click on the "Update" button.
 ZEIT.IO - DATEV Upload Mail Configuration
On this page, in the first grayed-out input field, you will find a randomly generated ZEIT.IO sender address for DATEV Upload Mail. ZEIT.IO will always use this email address to send invoice documents to DATEV. Copy this address to the clipboard. This address must be stored with DATEV as an authorized sender.
Also enter a "Forward Email" address. The forward email is your own email address or an email address from your company. If ZEIT.IO receives emails for your DATEV account, these emails will be forwarded to the "Forward Email" address. Once you have stored this address, please click on the "Update" button.
DATEV Upload Mail Configuration
DATEV Unternehmen online offers a way to automatically send receipts to DATEV and save them there using the 'Upload Mail' function. The steps for the setup are described below.
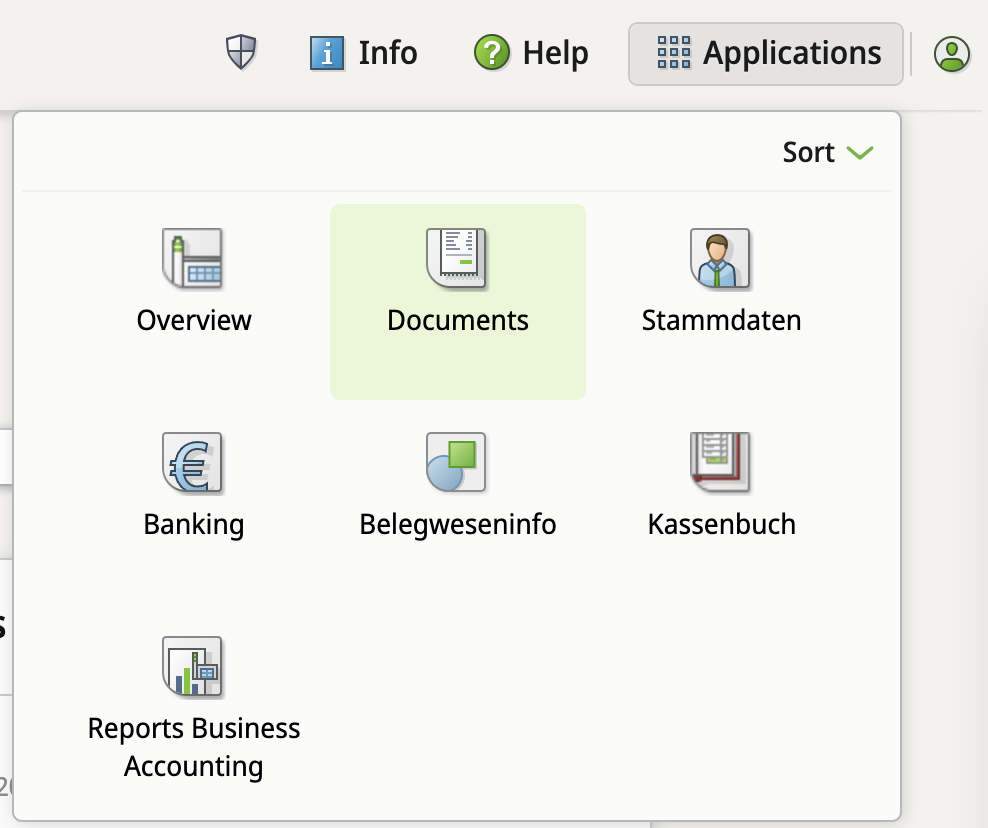
In DATEV Unternehmen Online, click on "Applications" in the top right and then on "Documents" ("Belege" in German). This could look like this, for example:
 DATEV Documents
Next, click on "Settings" in the main menu. "Einstellungen" in German.
 DATEV Settings
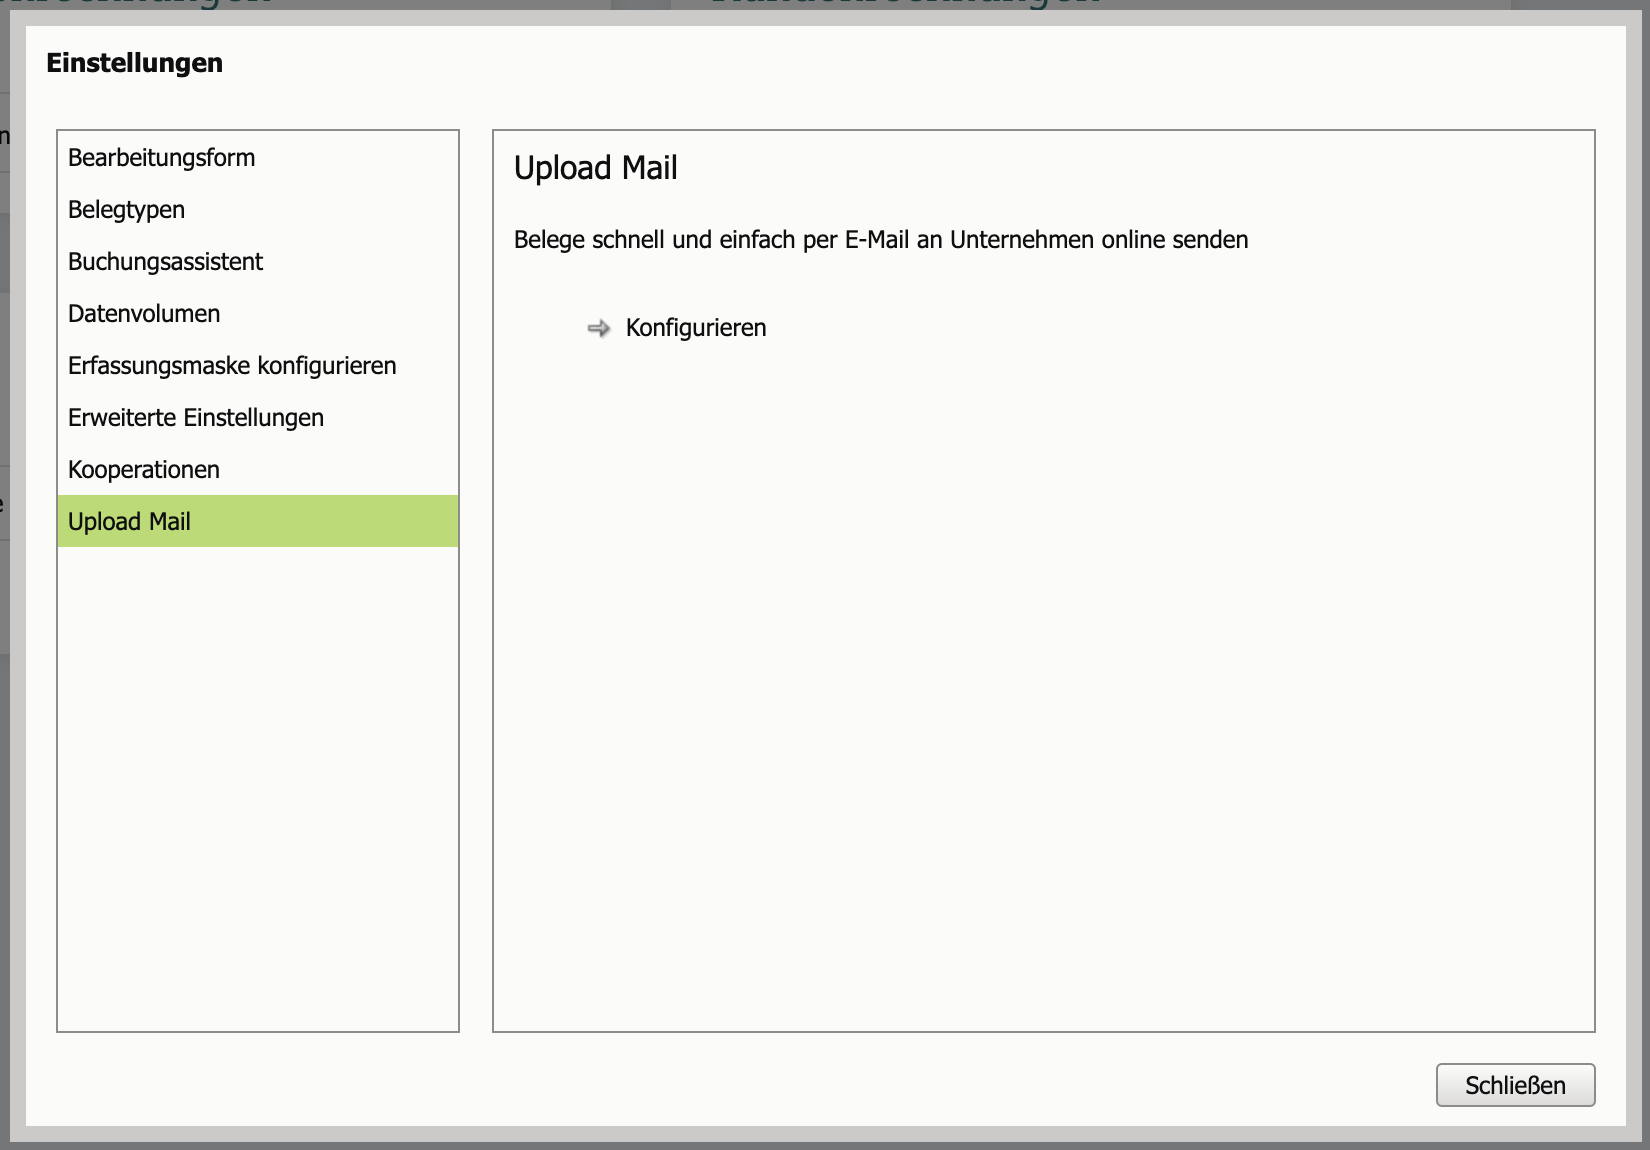
... and then click on "Upload Mail" and then on "Configure" or "Konfigurieren" in German.
 DATEV Upload Mail
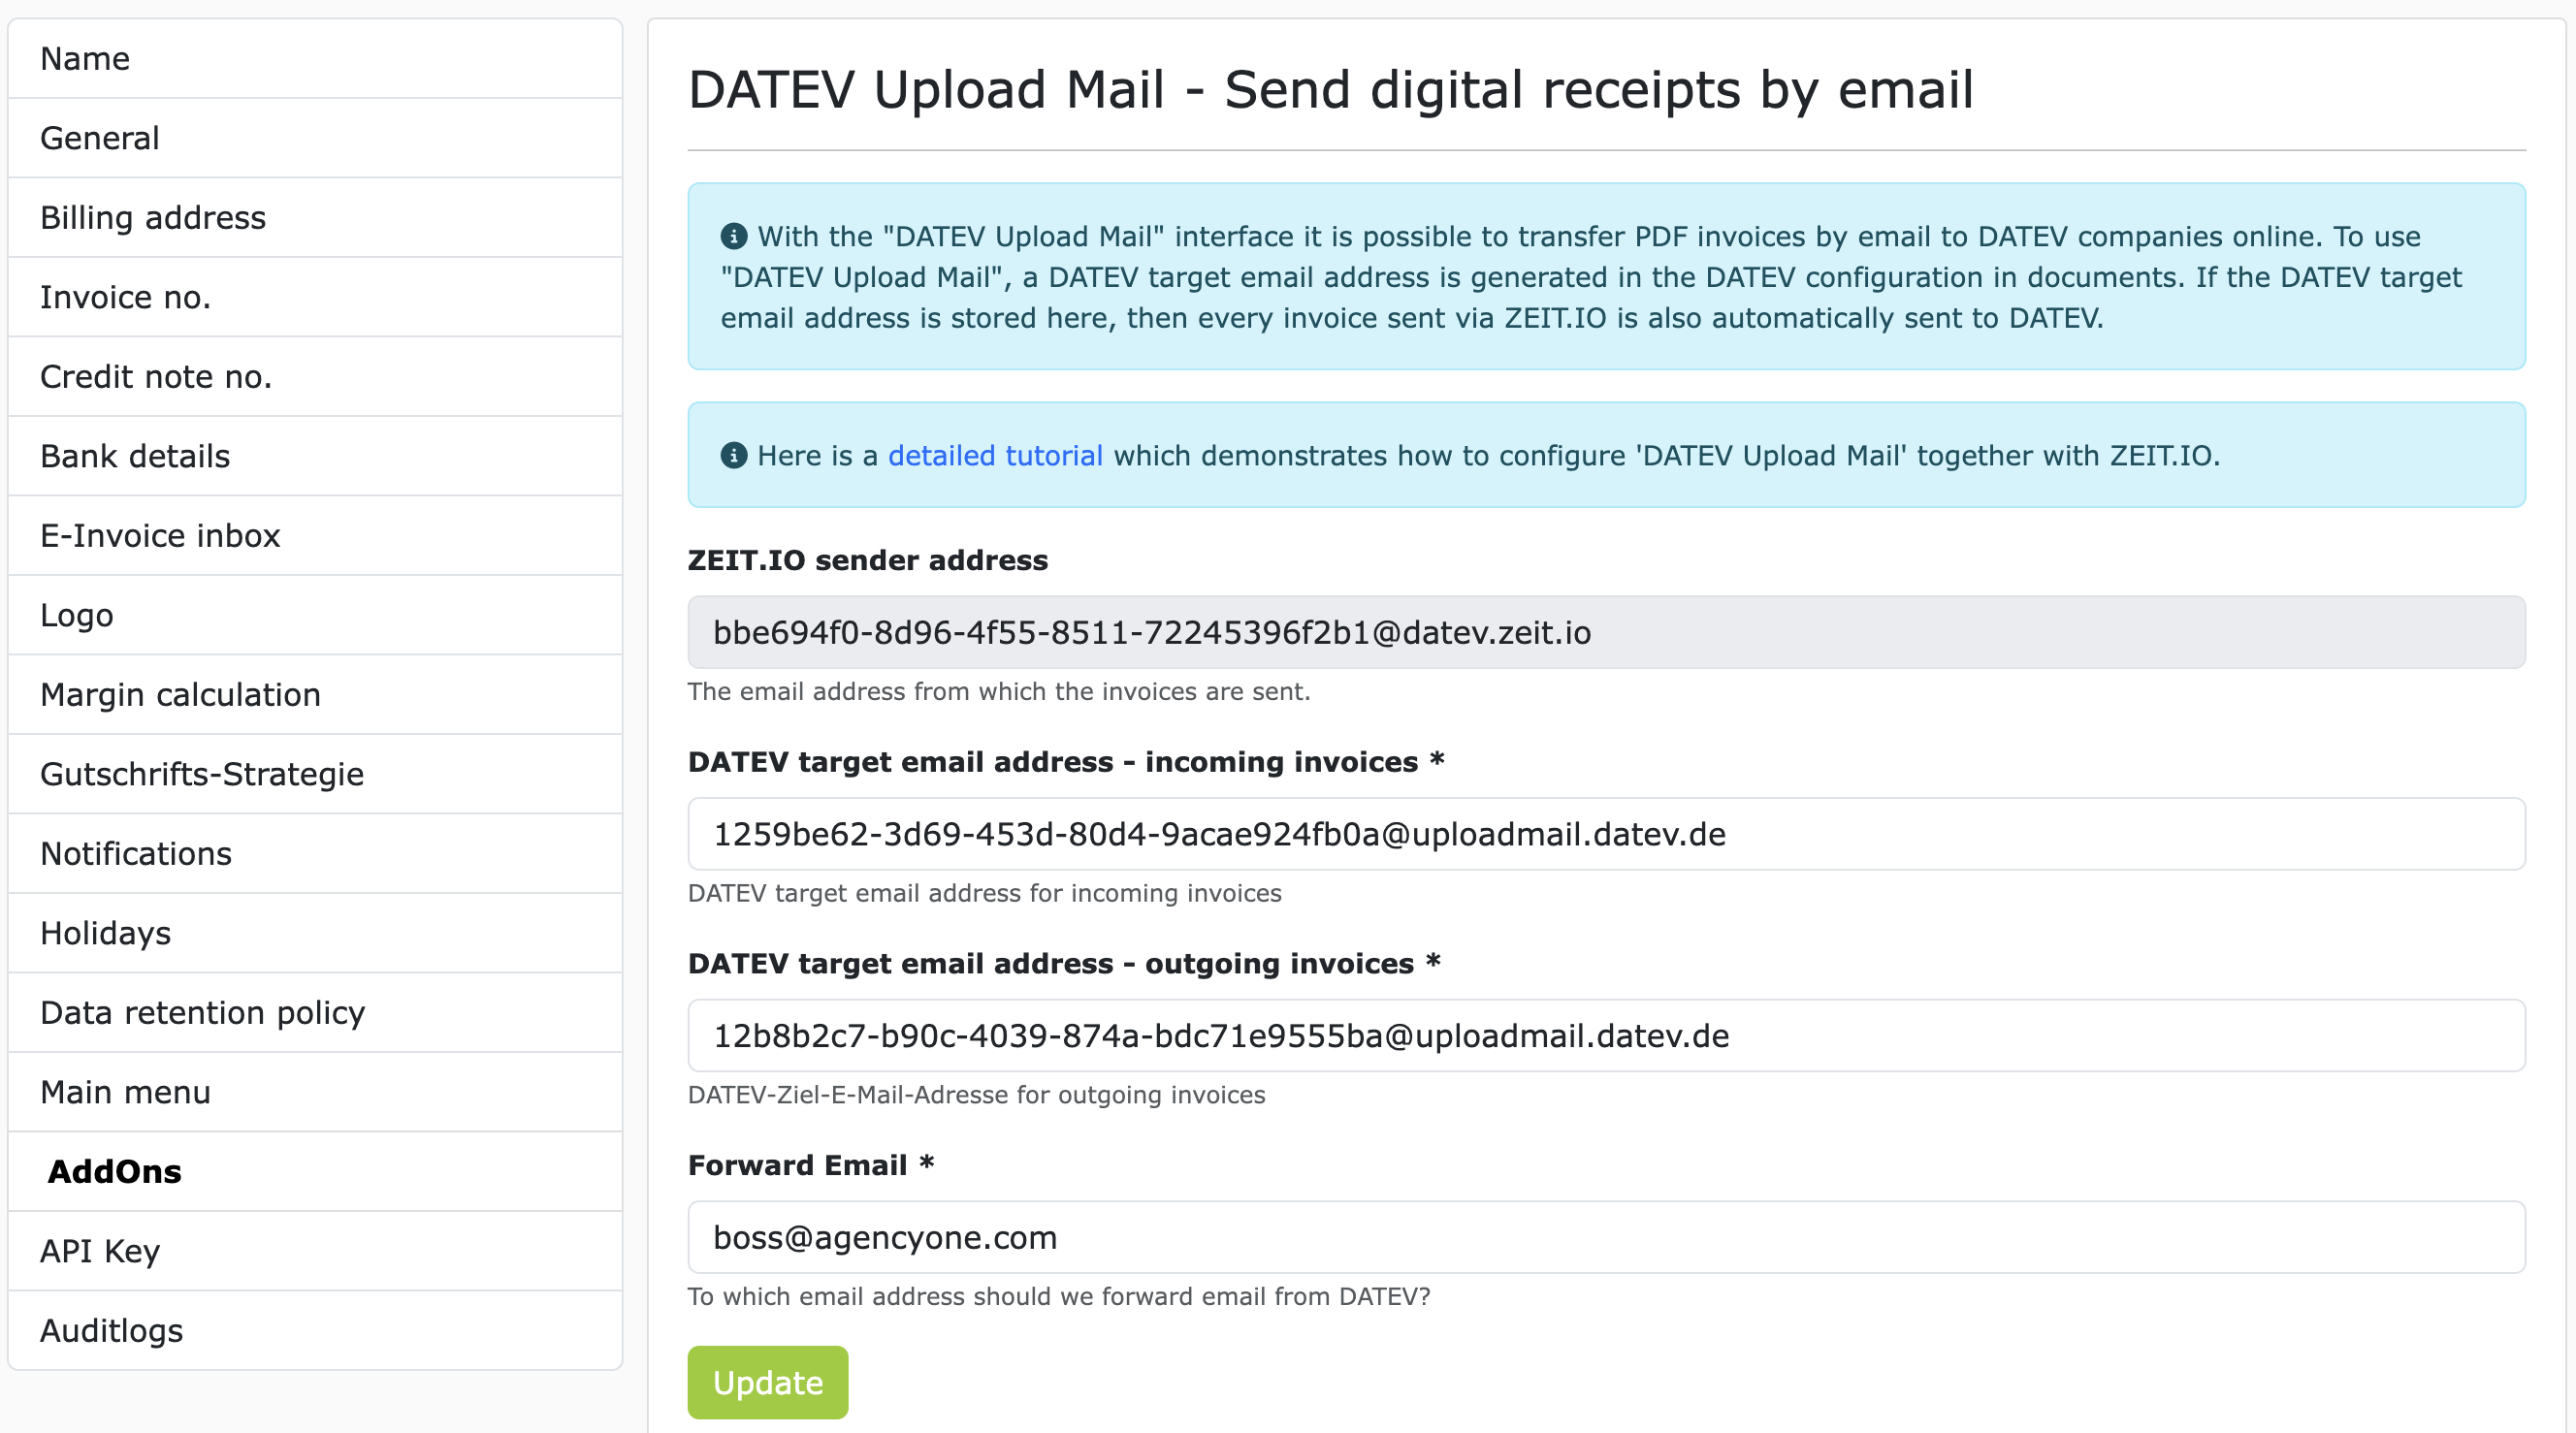
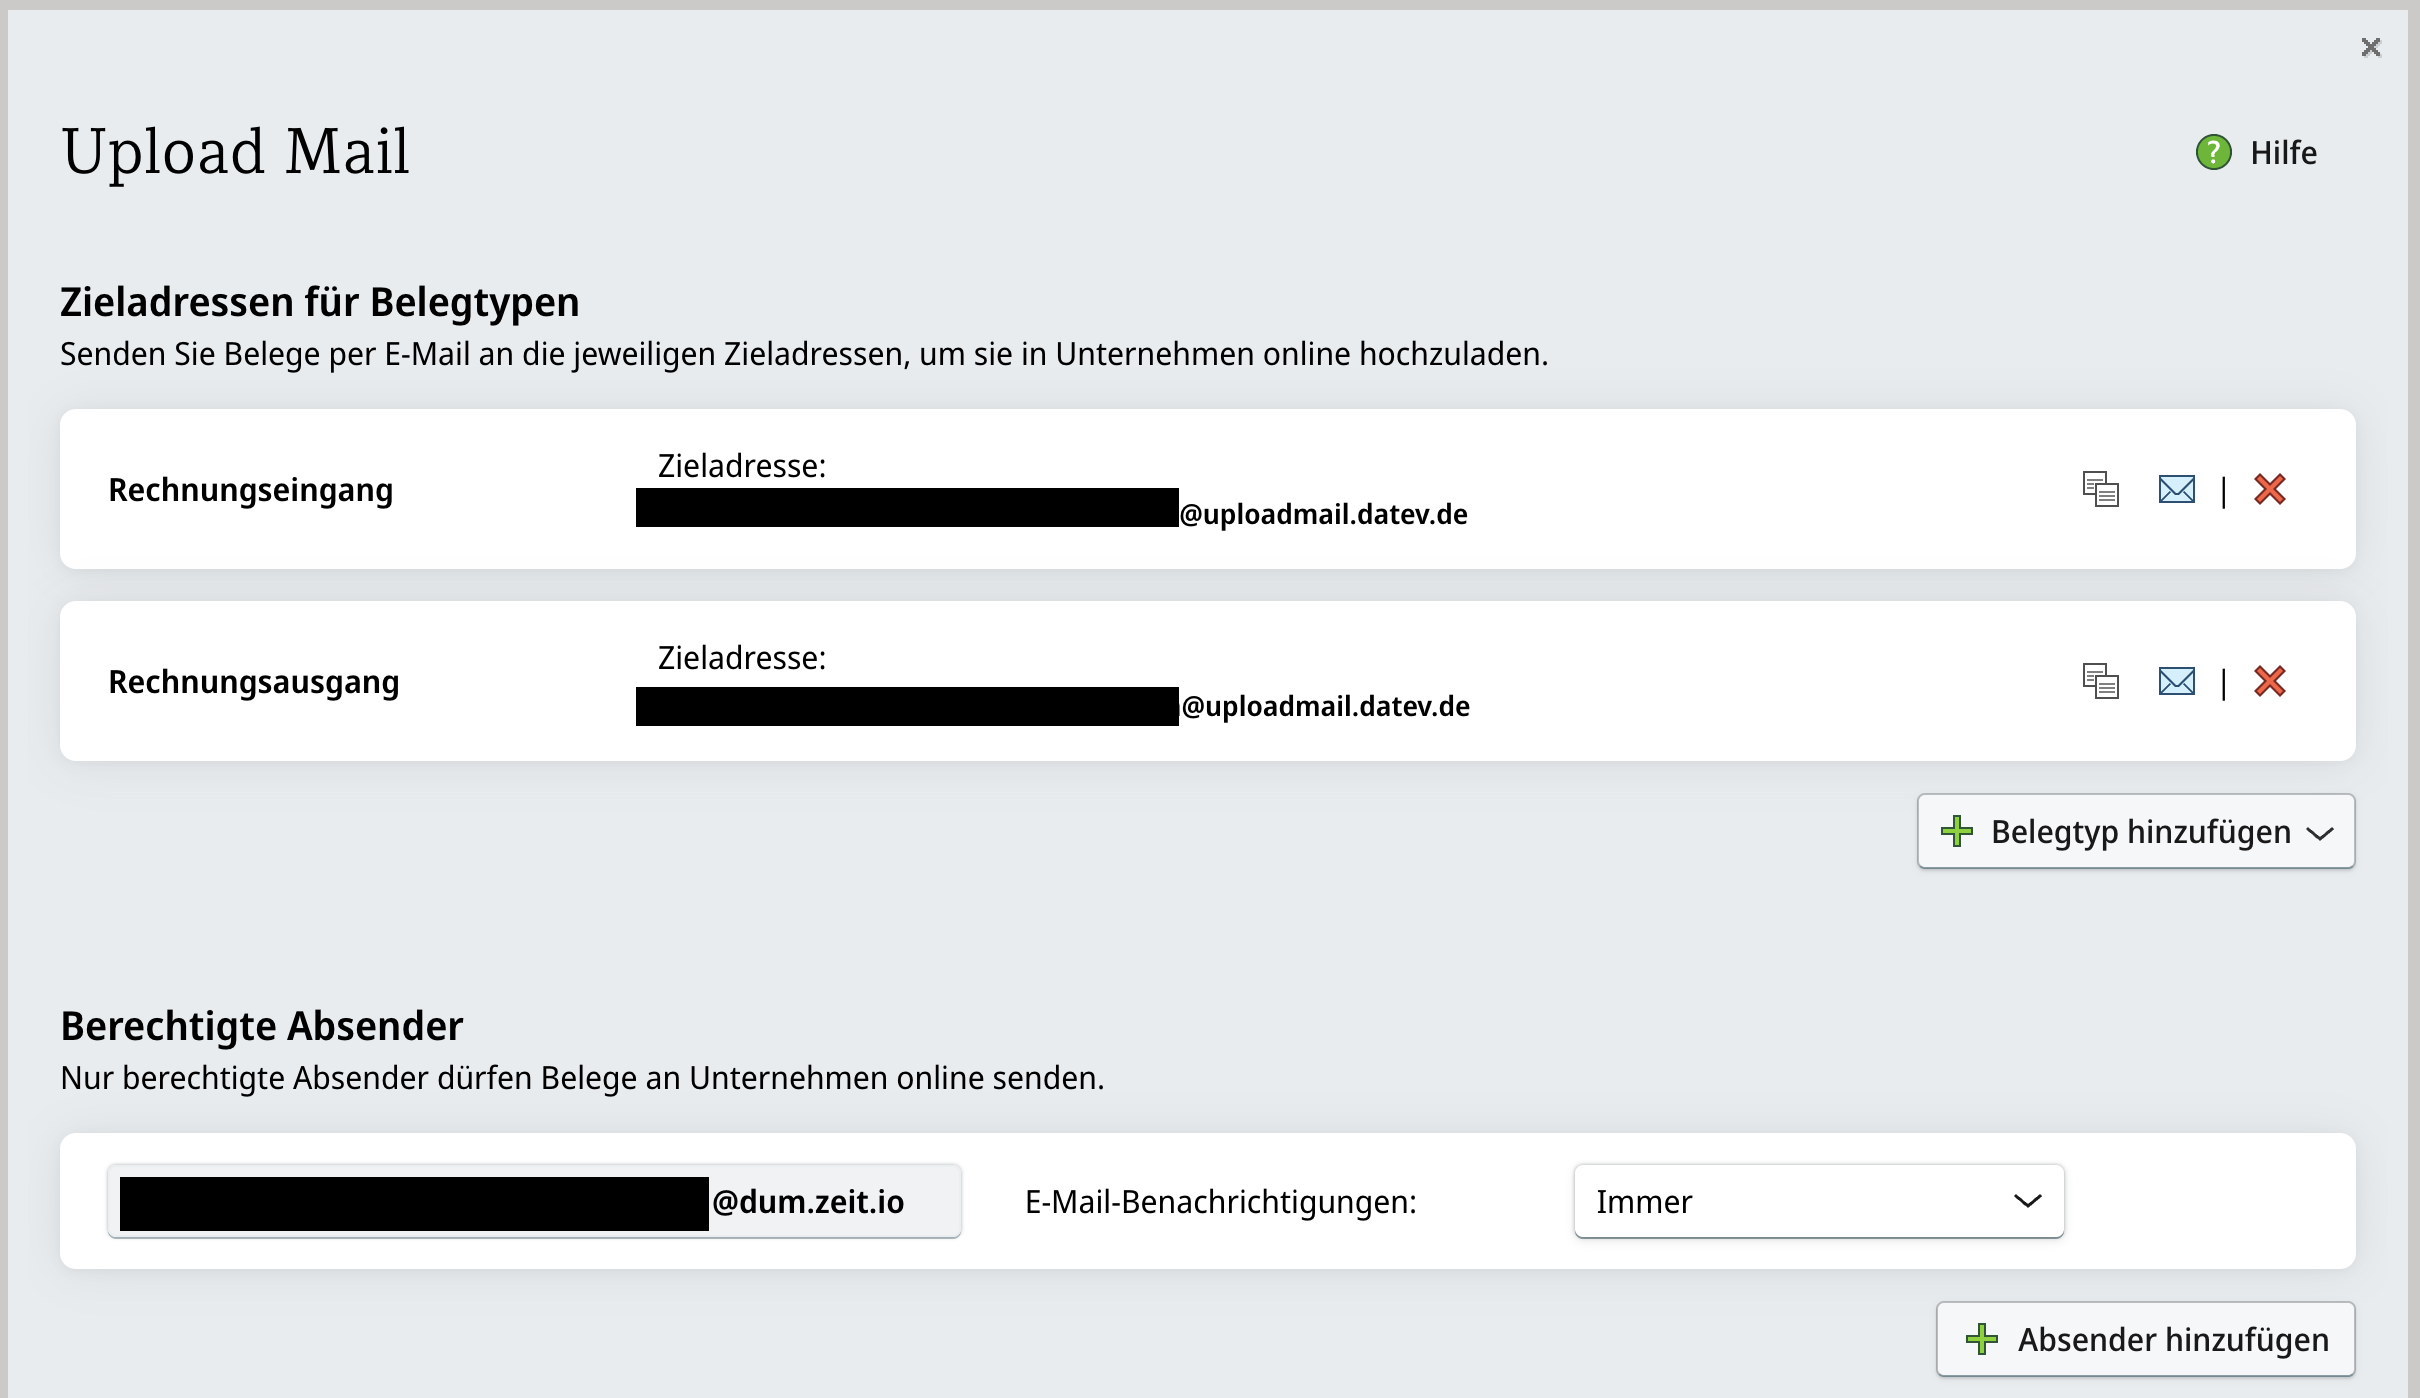
On the following page you will now see the configuration for Upload Mail. Here you should see two randomly generated email addresses, for incoming invoices and outgoing invoices. The addresses have the following pattern: "<RANDOM>@uploadmail.datev.de".
If you do not see the addresses, please click on "Add document type" ("Belegtyp hinzufügen" in German) to add the addresses for incoming invoices and outgoing invoices. It should then look something like this:
 DATEV Upload Mail - Configuration
Now add the ZEIT.IO sender address from the clipboard to the list of "Authorized senders" ("Berechtigte Absender" in German).
Then copy the target address for incoming invoices to the clipboard and navigate to the ZEIT.IO page. Now enter the DATEV target email addresses at ZEIT.IO. And repeat the whole thing for the target address for outgoing invoices. When all fields are filled in, click the "Update" button. When you're done, it should look something like this:
 DATEV Upload Mail configuration at ZEIT.IO
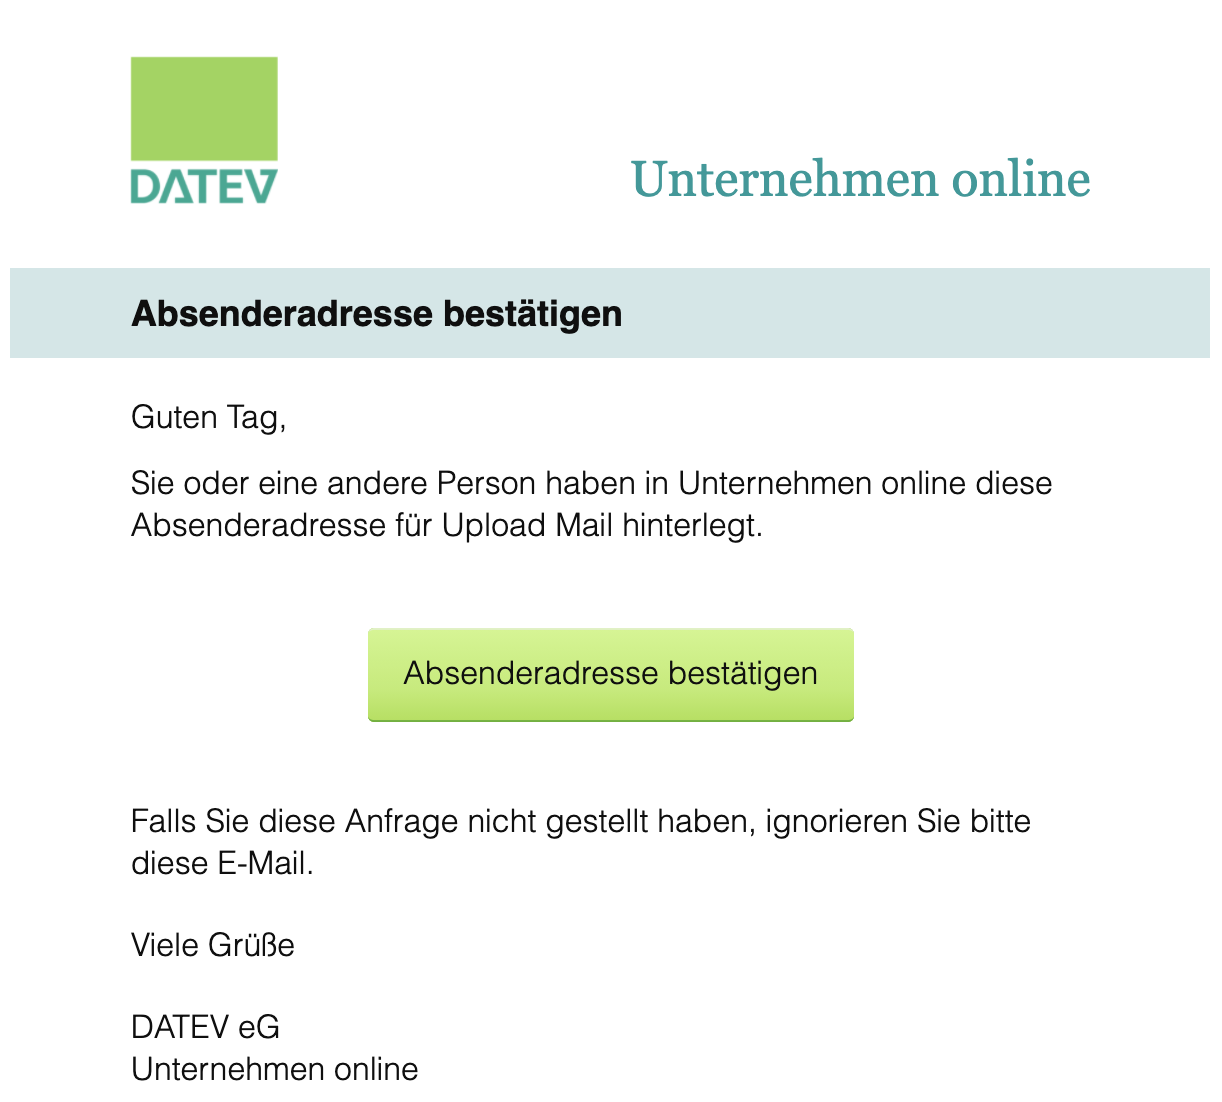
After you have successfully entered the ZEIT.IO sender address with DATEV, you will receive a confirmation email from ZEIT.IO. The email will look something like this:
 Confirmation Email from DATEV
Please click on the green button "Absenderadresse bestätigen" ("Confirm sender address") in the Email!
This completes the configuration and establishes the connection to DATEV!
In DATEV Unternehmen Online, click on "Applications" in the top right and then on "Documents" ("Belege" in German). This could look like this, for example:
 DATEV Documents
Next, click on "Settings" in the main menu. "Einstellungen" in German.
 DATEV Settings
... and then click on "Upload Mail" and then on "Configure" or "Konfigurieren" in German.
 DATEV Upload Mail
On the following page you will now see the configuration for Upload Mail. Here you should see two randomly generated email addresses, for incoming invoices and outgoing invoices. The addresses have the following pattern: "<RANDOM>@uploadmail.datev.de".
If you do not see the addresses, please click on "Add document type" ("Belegtyp hinzufügen" in German) to add the addresses for incoming invoices and outgoing invoices. It should then look something like this:
 DATEV Upload Mail - Configuration
Now add the ZEIT.IO sender address from the clipboard to the list of "Authorized senders" ("Berechtigte Absender" in German).
Then copy the target address for incoming invoices to the clipboard and navigate to the ZEIT.IO page. Now enter the DATEV target email addresses at ZEIT.IO. And repeat the whole thing for the target address for outgoing invoices. When all fields are filled in, click the "Update" button. When you're done, it should look something like this:
 DATEV Upload Mail configuration at ZEIT.IO
After you have successfully entered the ZEIT.IO sender address with DATEV, you will receive a confirmation email from ZEIT.IO. The email will look something like this:
 Confirmation Email from DATEV
Please click on the green button "Absenderadresse bestätigen" ("Confirm sender address") in the Email!
This completes the configuration and establishes the connection to DATEV!
Send receipts to DATEV
If you now create and finalize an invoice on ZEIT.IO, the PDF invoice is automatically sent to DATEV outgoing invoices. Thus the process is completely automated. You no longer have to download PDF invoices and manually upload them to DATEV. This manual step is completely eliminated!
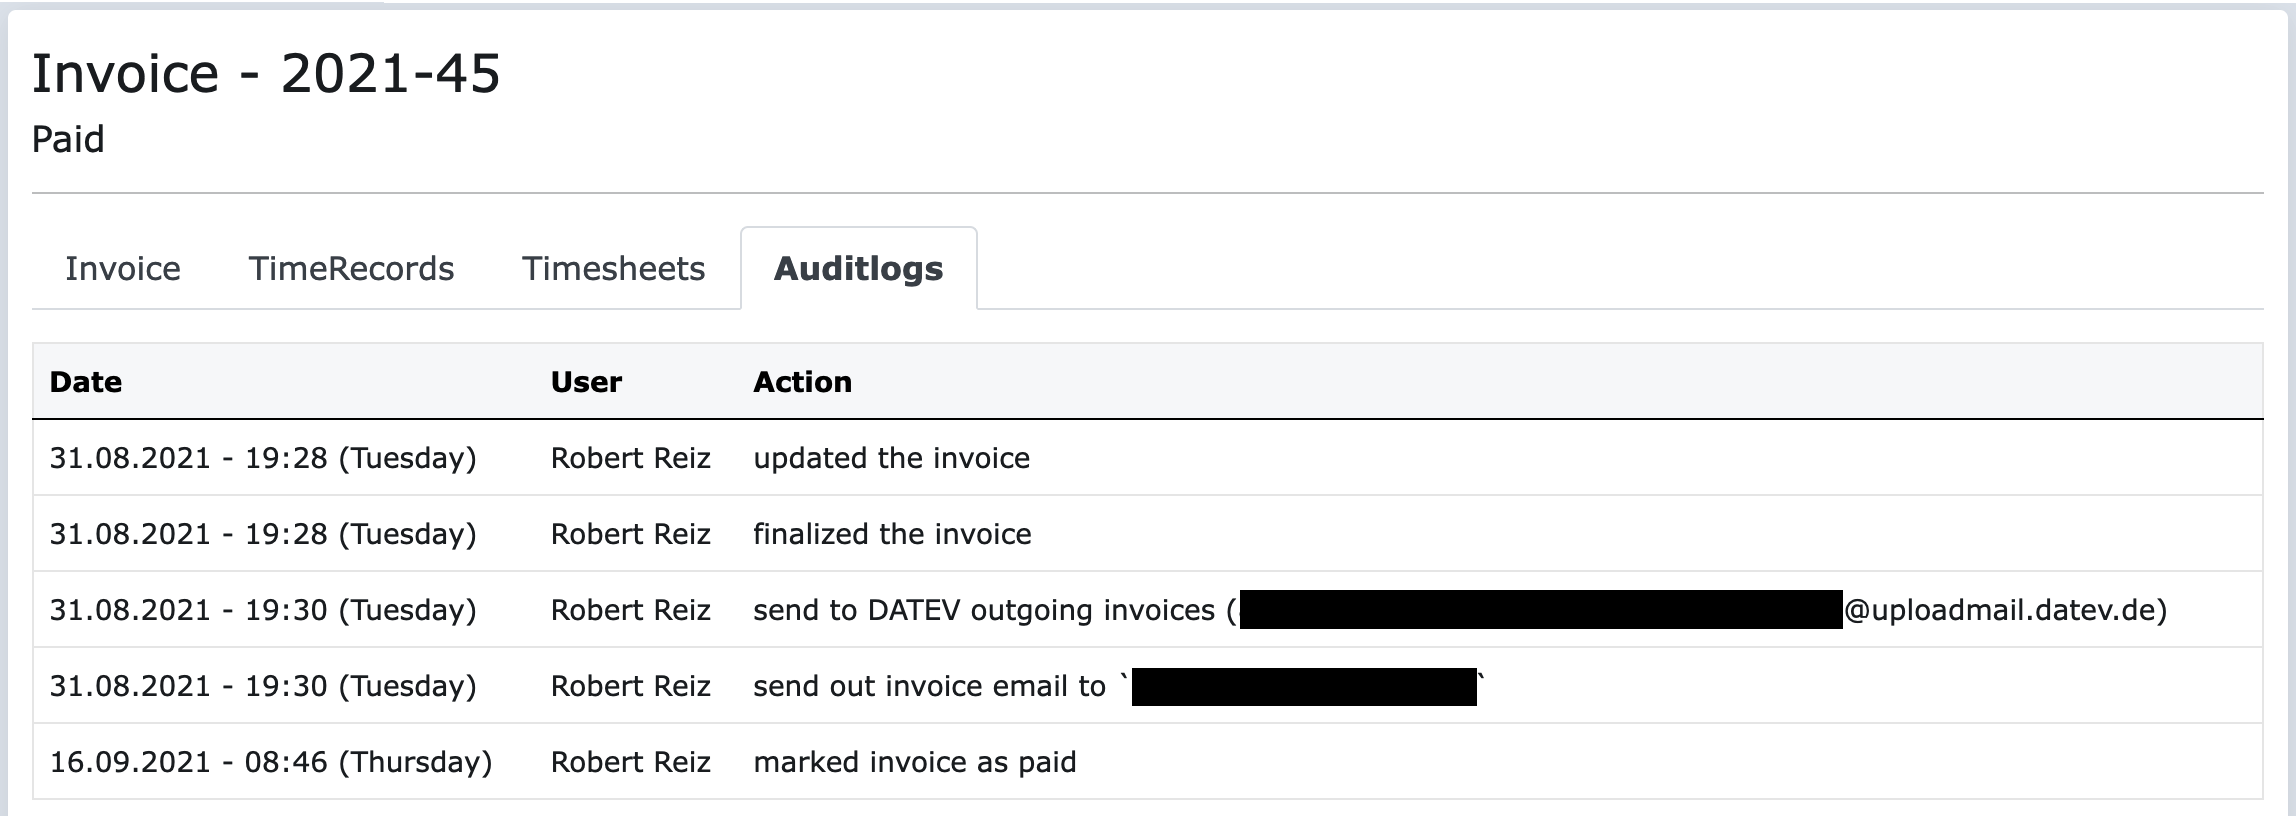
If you have created and finalized invoices before DATEV integration, you can still explicitly send these invoices to DATEV. In the invoice detail view, there is now a new action "Send to DATEV outgoing invoice" on the far right under the actions.
 Send invoice to DATEV
This allows you to explicitly send a finalized invoice to DATEV at any time.
In the audit logs of an invoice, you can also see when the invoice was sent to DATEV. Here's an example:
 Auditlogs for a ZEIT.IO invoice
Once the DATEV integration has been set up, you don't have to do anything else. Every invoice that you create and finalize on ZEIT.IO automatically ends up in your DATEV account. The whole thing happens in real time, without delay. The process is completely automated and that way you have more time for the really important things in life.